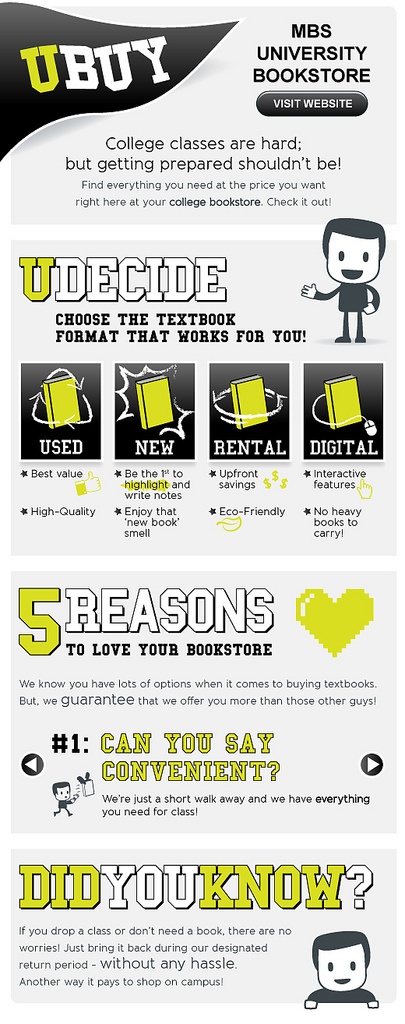
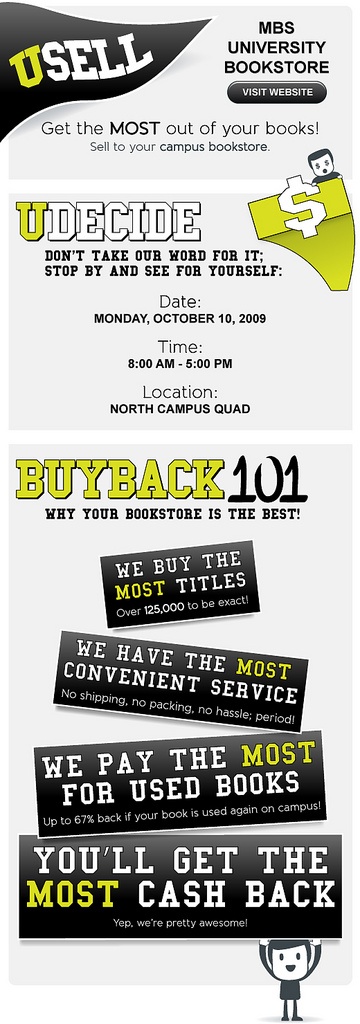
There's more competition than ever before - so it's time to pull out all the stops when it come to advertising to your students! Because they're constantly connected to social media, your Facebook page is a great place to get the message out about upcoming events. That's why we created customizable 'Buy' and 'Sell' Facebook tabs for you to add to your page. They'll help you communicate your store's benefits to students during key time periods such as Buyback and Rush and even direct students to your website for more information! Best of all, there's no HTML knowledge required!
Just follow these simple steps to get started:
- Click here to download a .zip file of both the buyback and rush promotional tabs
- Save the file to your preferred location. We suggest your Desktop.
- Locate the file at your preferred location and right click. Select 'Extract All'
- Again, choose a preferred location to save the file and select 'Extract'
- Remember where you have these files saved as you will need them during the next steps
- Scroll down and continue on to either add a Buy! or Sell! Tab by following the instructions below!
To Add A Buy! Tab for Textbook Rush:
- Go to Facebook and log-in to access your store's page.
- In the search bar at the top of the page, search for the iframe tabs application called 'Static HTML...Second Tab' and click it.
- On the left side of the 'Static HTML' page, below the profile image, click the 'Add to My Page' link.
- Select your store's Facebook page.
- Navigate to your page's Wall and click: 'Edit Info,' located at the top, just below your page name
- On the left side of the page, find the 'Apps' link, which should be about halfway down in the list.
- Find the 'Static HTML' application, then click 'Edit Settings,' and add your desired tab name. We suggest using Buy Textbooks! but you can use whatever you'd like.
- At the top-right of your Facebook screen, click the 'View Page' button to go back to your Facebook Page.
- On the left side of the page, below the profile image, you will see your page's tabs. Click on your new tab by locating whatever name you selected in the step 7. (If you do not see it in this list, then click the 'More' link to view more tabs. Your new tab may be hiding.)
- Navigate to your preferred location where you saved the Facebook Tabs file during the first steps. Right click the Buy.htm file and choose to 'Open With' Notepad (PC) or Text Edit (Mac). Do not open it in Microsoft Word.
- Copy everything within this document.
- Then, return to your Facebook page and click on your new tab, again. Paste the code you copied into the first window labeled 'Enter your content here.'
- Next, you'll need to customize your tab to include your store name and website URL. You MUST complete this step as the tab comes pre-programmed with MBS' information within it. It's easy, we promise!
- Just scroll down about a quarter of the way through the code that you pasted into the first window. Then:
- To customize your bookstore name...Find the gold text that reads: <!-- YOUR UNIVERSITY NAME --> and edit the text immediately below it by highlighting "MBS University Bookstore" and replacing it with your store's name!
- To customize the link to your website...Find the gold text: <!-- LINK TO YOUR BOOKSTORE WEBSITE --> and edit the link immediately following by highlighting "http://www.mbsbooks.com" and replacing it your store's URL.
- OPTIONAL: Our tab includes the fact that your store sells all 4 available textbook formats: new, used, rental and digital. If this is not the case, simply follow these instructions to customize your available textbook options by removing certain sections.
- Find the gold text: <!-- Rental Books--> highlight this text and everything else through the next <!-- END --> then delete. Repeat for <!-- Digital Books --> if necessary.
- Don't forget to save! Click on the 'Save and View Tab' button at the top, just above your edit window. You will then have the option to view your new tab as others will see it when they visit your Facebook page. You're done!
To Add A Sell! Tab for Buyback:
- Go to Facebook.com and log-in to access your store's Facebook page.
- In the search bar at the top of the page, search for the iframe tabs application called 'Static HTML' and click it.
- On the left side of the 'Static HTML' page, below the profile image, click the 'Add to My Page' link.
- Select your store's Facebook page.
- Navigate to your page's Wall and click: 'Edit Info,' located at the top, just below your page name.
- On the left side of the page, find the 'Apps' link, which should be about halfway down in the list.
- Find the 'Static HTML' application, then click 'Edit Settings,' and add your desired tab name. We suggest using Sell Books! or Bookstore Buyback! but you can use whatever you'd like.
- At the top-right of your Facebook screen, click the 'View Page' button to go back to your Facebook page.
- On the left side of the page, below the profile image, you will see your page's tabs. Click on your new tab by locating the name you selected in step 7. (If you do not see it in this list, then click the More link to view more tabs. Your new tab may be hiding.)
- Navigate to your preferred location where you saved the Facebook Tabs file during the first steps. Right click the Sell.htm file and choose to 'Open With' Notepad (PC) or Text Edit (Mac). Do not open it in Microsoft Word.
- Copy everything within this document.
- Then, return to your Facebook page and click on your new tab, again. Paste the code you copied into the first window labeled 'Enter your content here.'
- Next, you'll need to customize your tab to include your store name and website URL. You MUST complete this step as the tab comes pre-programmed with MBS' information within it. It's easy, we promise!
- Just scroll down about a quarter of the way through the code that you pasted into the first window. Then:
- To customize your bookstore name...Find the gold text: <!-- YOUR UNIVERSITY NAME --> and edit the text immediately below by highlighting "MBS University Bookstore" and replacing it with your Bookstore name.
- To customize the link to your website...Find the gold text: <!-- LINK TO YOUR BOOKSTORE WEBSITE --> and edit the link immediately following by highlight "http://www.mbsbooks.com" and replacing it with your store's URL.
- To customize your buyback information...Find the gold text: <!-- EDIT: DATE --> and edit the date information below it by highlight our sample "Monday, October 10, 2011" text, and adding your own information. Repeat this for <!-- EDIT: TIME --> and <!-- EDIT: LOCATION --> for full customization.
- Don't forget to save! Click on the 'Save and View Tab' button at the top, just above your edit window. You will then have the option to view your new tab as others will see it when they visit your Facebook page.
You're all done!


